Upgrading Home Router (again)
Upgrading the platform
Last December I bought a mini PC, a Intel N100 CPU with 6 LAN ports. The other router did not really perform anymore and it was time to upgrade. Although I ordered the device without RAM and storage, the order was received with 16GB of RAM and a 256GB NVME SSD installed. Nice gift. I had ordered a 16GB DDR5 and another SSD. So what to do with the extra SSD?
Creating a USB multiboot storage
I got a nice USB NVMe Enclosure and installed the SSD, this would make a very nice and fast bootable USB stick. Using Yumi and my Game PC I created the bootable stuff on the disk. Maintaining and adding boot options is simply a matter of adding the ISO to the drive and update a text file. You do need to keep in mind that this system follows Windows path delimiter. So using '\' instead of '/'.. Not something I am used to, but still easy enough.
Sudden reboots
Anyway after running the platform for a couple of months, we experienced sudden reboots, I could not figure out what the problem was. Reinstalled OPNSense, but no luck. Tried the RAM I had ordered and the system did not even boot. Just a annoying constant beep when booting. Reinstalled the memory that was included and now it worked again.
Nevertheless I had some doubts, this time about the quality of the included SSD and/or memory. Time to do a deep dive investigation.
I still have my old router, although not the fastest and the throughput is limited, but doable for a situation like now. I placed the old router and made sure internet works. Now let me figure out why the sudden reboots occur. And what I can do? This time I wanted to run Proxmox VE on the platform and run OPNSense in a VM.
Replacing RAM and storage
Since the mini PC supports two NVMe SSD drives, and a maximum of 32 GB of DDR5 RAM. I ordered a couple of weeks ago some upgrades:
Not bad hardware, this should work, right? Last Pentecost weekend I finally had the time to investigate and come up with solutions and/or fixes.
Installed the hardware and let’s start with the software installation. I did notice that the device was hotter then expected. But not alarming at the moment.
Installing Proxmox VE
Installing was the easy part. Thanks to the multiboot drive; it is just a matter of a couple of steps, no more mucking around with a USB thumb drive and the dd command.
This time having the ISO stored in the USB drive is enough to boot from.
- Boot device using F11 to select USB drive.
- Select desired ISO.
- Boot into (in this case) OPNSense.
- Install OS.
- Reboot.
In order to be able to configure the network as desired, and considering when I would attach this platform directly to it, the “LAN” side of the the platform would be the same IP range. This will not work. Time for some creative thinking. I came up with following solution.
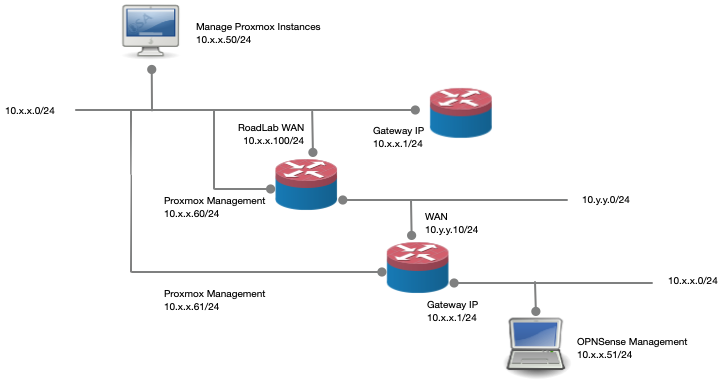
My home LAN is 10.x.x.0/24 and my road LAN is defined as 10.y.y.0/24. The Road Domain platform is also connected with the WAN port to the home LAN. I disabled the security setting on the WAN port to disallow RFC 1918 networks.
The improved platform is connected to the LAN side of the Road Domain as the WAN side. Both Proxmox platform devices are connected to the home lan with their management ports. Now I am able to access the management interface of both Proxmox VE applications and these can access the internet via this connection.
With this approach I can simply setup the router platform with the existing IP range separated from production home LAN with the laptop. Yes, you would need access to two computers. When I am ready and the config is done, tested and such, it is simply a matter of replacing the gateways.
Adding OPNSense VM
Creating a VM is pretty straight forward. Or at least defining the VM, that is. When I try to install OPNSense, the sudden reboots and stuck systems are back… Not really clear why…
Platform stuck mid installation
A number of times the system just got stuck and I had to do a hard reset. And even then a couple of times the annoying constant beep was back directly on boot, like the mini PC does not do a complete POST.
Could it be that the RAM and SSD are not properly seated? Taking it apart, yet again. It was a bit hot to the touch, still not registering enough at the moment.
Realization
My problem is not the components, it is heat. The system is overheating, thus shutting down. And when it is cooled down enough it will POST.
Ok, so heat is the problem, now I need to figure out a working solution. It could be that the thermal paste is not good enough. I took the platform apart and cleaned the surfaces. I did notice that the surface on the case was not really that smooth. A lot of fine grooves are noticeable. Not something I can address. I had some Noctua thermal paste, so applied that. What else could I do to reduce the temperature? I briefly contemplated adding a couple of USB powered Noctua NF A8 5v fans. An ugly solution, sticking fans to a fanless case… Some irony is noted.
As a trial I placed the case on it’s side and let it run just with Proxmox VE running and one OPNSense VM. No clients connected, and a load of around 1% to 3%. Not really a huge load of this system. But still, it runs very hot. And so hot, that in less then 12 hours running, the platform got stuck twice.
Conclusion of analysis
This platform is not trustworthy enough. This needs to be replaced. What to do next, do I buy another Chinese clone of a Protectli Vault, or do I bite the bullet and get my self a real one instead.
After some consideration and figuring out which Vault fits both my budget and needs, I bit the bullet and got myself the Protectli Vault FW6E, this one seems to be a nice platform to run Proxmox VE and a OPNSense VM and perhaps some other VM’s or CT’s.
Too bad is the memory or the NVMe not compatible with this platform, however the price differences do not warrant one that does support NVMe SSD.
Installing on Protectli Vault
Installing the hardware is pretty simple, like always. I got the following components:
Seems reasonable components and affordable.
Setting-up Proxmox VE Again
After it arrived, the build of the device is pretty simple. However this time around I did a Memory+ test before installing Proxmox VE. When booting from the latest ISO, one can choose the testing of Memory. And using the SSD multiboot it is a real easy trick.
After a successful memory test, in which the temperature rose to less then 60°C, the case was quite warm to the touch. Not alarmingly hot, but still. I let the device cool down before continuing with the installation.
Back to where I was, little of a week ago, having a clean install of Proxmox VE. Setting up is really simple. Because I am very happy with the product, for this device I got myself the Proxmox VE Community license. For € 110 I am supporting the product and am getting access to the Enterprise Repository and with stable software updates. For me worth it.
I had some trouble in getting the desired setup, in the end I got it working for me just fine. Just a matter of starting over. On the boot-drive, I run the VM’s and such. On the extra 1TB SSD I store the backups and images to install VM’s with.
OPNSense VM
Installing the OPNSense VM is now working as expected, the installer is a just a simple 1,2,3 done. Since I have 32GB RAM available, I allocated 24 to OPNSense, and 6 threads of the CPU, more then enough to run OPNSense and Zenarmor. Using the Linux Bridge I added both NIC’s to the VM. Now every time I add another VM, I simply add it to the LAN bridge and presto, software switch ready and the VM is is like a real device accessible from the LAN itself.
The management port is also connected to the switch, this enables me to manage the hypervisor. Perhaps that could be done differently I do not know (yet). Getting the VM to work, is a matter of upgrading the OS to the latest version, restoring the backup of the config, installing missing plugin’s and redo Zenarmor. I let the device
Additional VM’s
I added two more VM’s to the hypervisor. One as Twingate Connector, this way access to the network is not limited to the NAS server. And while I am at it, I added another AdGuard Home instance. Now I have two DNS servers running on my local network. On one of the other VM’s I have running on the NAS I added the AdGuard Home Sync service. Setting this docker up and running turned out to be a bit of a fiddle. The documentation has some gaps.
AdGuardHome Sync
On the server where I am already running NPM in a docker-compose. Best is to add this docker instance next to it. After some searching I figured it out. For me this worked, no warranties what so ever.
- In the home folder of the root user I created a folder:
adguardhome-sync. - In it I created a folder
configand in that folder I created a fileadguardhome-sync.yamlFor my the content of that file is:
# cron expression to run in daemon mode. (default; "" = runs only once)
cron: "*/10 * * * *"

origin:
  # url of the origin instance
  url: http://<IP of First Instance>:port
  # apiPath: define an api path if other than "/control"
  # insecureSkipVerify: true # disable tls check
  username: <admin>
  password: <password>

# replica instance (optional, if only one)
replica:
  # url of the replica instance
  url: http://<IP of Replica>:port
  username: <admin>
  password: <password>

# Configure the sync API server, disabled if api port is 0
api:
  # Port, default 8080
  port: 8080
- The docker-compose file
docker-compose.yml
---
services:
  adguardhome-sync:
    image: lscr.io/linuxserver/adguardhome-sync:latest
    container_name: adguardhome-sync
    environment:
      - PUID=1000
      - PGID=1000
      - TZ=Etc/UTC
      - CONFIGFILE=/config/adguardhome-sync.yaml #optional
    volumes:
      - /root/adguardhome-sync/config:/config
    ports:
      - 8080:8080
    restart: unless-stopped
It took some effort, bu now like magic the settings are synced, very nice.
Additional Changes to the network infrastructure
In the past I have created a managed network with all kinds of brands of switches, lastly the DGS-1210-20 switch from D-Link. It kinda works. I would like to have more the two VLANs working across a single trunk connection. For some reason I just could not get it to work. I would lik to have my IoT devices in a separate VLAN, next to the Guest VLAN. In theory possible, however in practice it just does not work. On any VLAN I define other then the two already working, it does not work. And no idea why. But for me these brands are on the lower side of the spectrum. And I would like a more robust enterprise quality switch without breaking the bank. As such, I am eying the Cisco Business 250 Series for some time now. However the price is still pretty steep for my home lab.
While shopping for the Protectli Vault, I came a across an offer I could not pass on. I found that Redshell.nl sold a couple switches in a Refreshed version for a very, very nice price. Less that € 100 ex. VAT a piece. The refreshed product have the same Cisco warranty of new products.
Using this brand as my home infrastructure has always been a desire. Now is the chance to do so. And although the budget is not really there. For less then one new switch, I am able to get two. I do not need a PoE switch, even if I would extend the amount of cameras and or upgrade my WiFi access points, using a couple of PoE injectors is perfectly fine.
End result
The platform is indeed better then the one I got last December. Having this experience is always the risk when you buy these Chinese clones. it is a hit or miss every time. For me this is a clear miss.
Also the upgrade to the rest of the infrastructure is a real improvement.
Very content with the end result. Hopefully the performance and such will not exhibit the problems we experienced in the last months.